3D Match Moving

Matchmoving is the process of matching CG elements into live-action footage, therefore the visual effects artists' goals are to make their 3D elements look as realistic as the scene that was filmed.
Week1 (20/09/2018)
3D Equalizer
This is a 3D software which that incorporates motion-tracking features supported by mathematical algorithms with a user interface and also, it enables the user to reconstruct precise 3D camera and object motion paths out of any type of live action footage.

Keyboard Shortcuts
Frames:
Z-Jump to start frame
X-Jump to end frame
A-Jump to previous keyframe
S-Jump to next keyframe
D- Delete keyframe
V-Step on frame forward
B- Step one frame back
Q- Track one frame forward
W- track one frame back
E- End/Start point
R- Flip track direction
T- Track
Y- Center 2D
F- Full frame view
G- Marker
Editor & Window:
Alt+1- Object Browser
Alt+2- Deviation Browser
Alt+3- Timeline Editor
Alt+4- Curve Editor
Alt+5- Attribute Editor
Alt+6- Parameter Adjustment Editor
Alt+7- Image Controls Windows
Alt+8- Python Console Window
Alt+9- Online Help Window
Alt+0- New 3D Window
Alt+C- 3D View
Controls:
F1- Overview Controls
F2- Manual Tracking Controls
F3- Distortion Grid Controls
F4- Auto-Tracking Controls
F5- Lineup Controls
F6- 3D Orientation Controls
Control+ Click- Select
Alt+ Click- Unselect
Week2 (27/09/2018)
Tracking
3D tracking is a process of analysing a film shot to understand and determinate where in world space the camera went.
If a special are is thought to be replaced, is highly recommended to track just around that specific are in order to obtain a great result.
Screen-Shots (3D Equalizer)

Importing data into the software

Tracking

Adjusting the Parameter
Viewing the levels of the tracking

3D View of the tracking

Adding arrows to the tracks, so is more visible on the scene
Images with track in green colour

Track and arrows on the scene

Placing and connecting a cube with the tracks
Viewing the cube in the scene followed by the tracks
Week3 (4/10/2018)
Lens Distortion
This could be problematic for motion tracking as it works best when the live footage is free from any lens distortion.

After tracking this scene in 3D Equalizer, we are able to see the how a Lens Distortion affect the scene.

Lens Distortion

No Lens Distortion
Week4 (11/10/2018)
Dynamic Focal Length
The focal length number tells us how much of the scene is captured in the picture. The lower the number the wider the view, and the more we can see. The higher the number, the narrower the view, and the less we can see.


On these four screenshots, we can observe the levels of Curve Editor and Deviation Browser for the two zooms in and out footage. The aim was to be able to track the sequence in different field (Zoom in and out).
Week5 (18/10/2018)
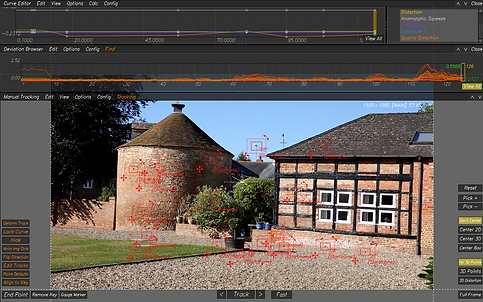
Surveys
The process that involves the critical interpretation of a real object and delivers its representation through 2D and 3D graphics models at an appropriate scale of representation.

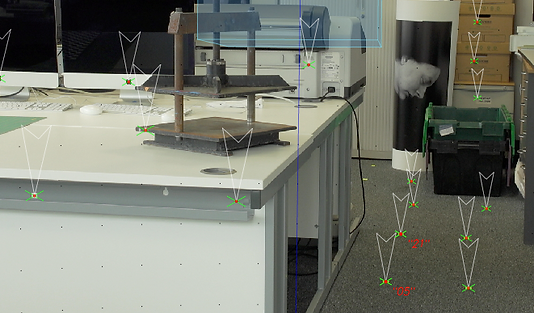
Track points named with the purpose to find it easily and do not mix with the next track points. These track point are the main tracks with the Origin track point included.

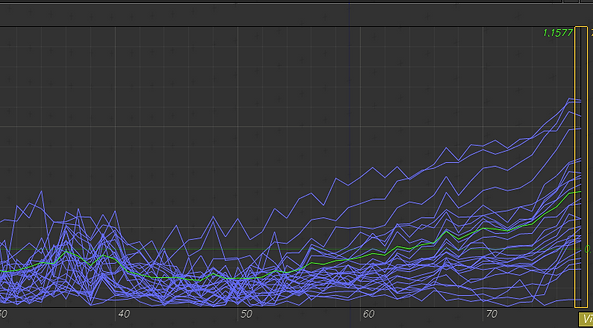
Deviation level in 1.5 with around 12 tracks points placed in different locations.

3D view with all the track points placed in the footage. The green colour means the main track pints and the black squares represent the manual tracking.

Deviation level dropped from 1.5 to 1.06. But in manual tracking view, the footage frame looks undistorted as the process has not finished yet.
Week6 (25/10/2018)
Object Tracking
In a tracking scenario, an object can be defined as anything that is of interest for further analysis. Objects can be represented by their shapes. Point representation is suitable for tracking objects that occupy small regions in an image, therefore tracking points in objects are detected in consecutive frames which will be represented by points, and the association of the points are going to be based on the previous object state which can include object position and motion

In this case, the box is tracked using seven images. Each photograph has its points to track in yellow or green colour.
In the point groups, we can observe four tracking groups, with the purpose to keep in order each side of the box tracked.

Tracking the box while it has been taken from the table was a bit complex, so I used the Image Controls with the purpose to bright the parts that were chosen to track.
Assignment 1 (26/10/2018)
Final Video (gif format)

Screen Recorded
Screen Shots
-3DE


-Nuke


Video Exported
Week7 (01/11/2018)
This day is actually a shooting day for the second assignment. A photo studio is arranged with the purpose to have the full control of camcorder, as the second assignment requires a clip with camera movement, track points, and then create a 3D object to place in the scene and comp in Nuke. For this shooting occasion, is recommended to keep in mind what was taught in the previous lessons about survey strategy, markers and planing the shot.
Week8 (08/11/2018)
This is the second week of shooting. In this day, it is possible to re-shoot again in case the previous shooting week someone missed something. For example; take more pictures, add more marks, change the camera angle or take more measurements of the area.

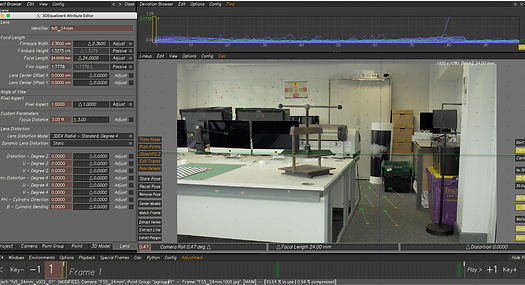
Camera and Lens information that will help to achieve a great result of tracking.
-Camera: Sony Fs100, Super 35mm Image sensor (23.6mm x 13.3mm)
-Camera Height: 104 cm
-Lens: 14mm
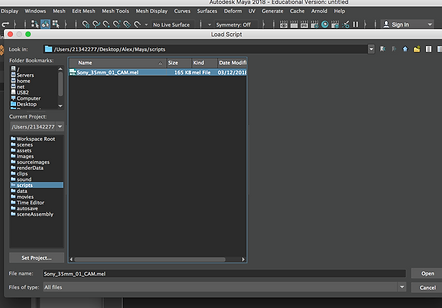
Week9 (15/11/2018)
Today's lesson is focused in how to set-up Maya software correctly, how to export footage from Nuke using the correct format and how to export from 3D Equilizer. The reason of this information will be helpful when creating an object in Maya and then transferring the model to Nuke.
3D Equilizer

3DE4/Export Project/Maya

3DE4/Export Project/Export Nuke LD
Nuke

Footage/BlackOutside/Script exported from 3DE/Transform (Overscan)/Write

Write/chose file for exporting/Render in jpeg
Maya

Importing the Nuke Script into Maya
This is how the Nuke script looks like in Maya. The Play symbol has to be pressed to bring the tracks "alive"
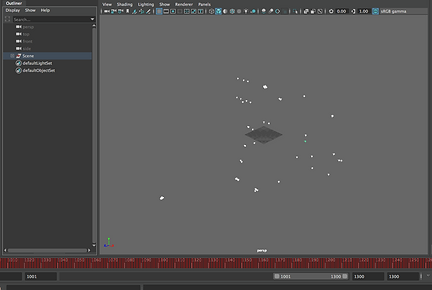

Tracks points in Maya
Using the first video frame to guide the objects
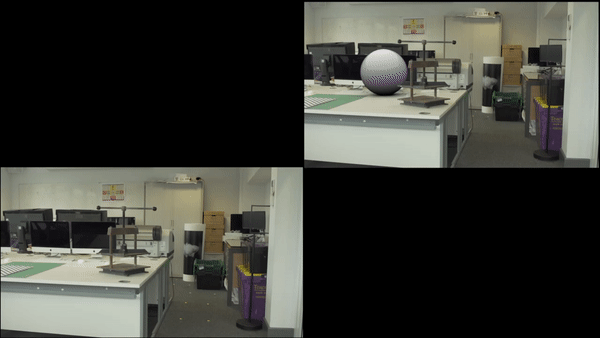
We can observe that any object placed in Maya will appear on the video image, in this way we can perfectly add lights and calculate the size of the objects.
Week10 (22/11/2018)
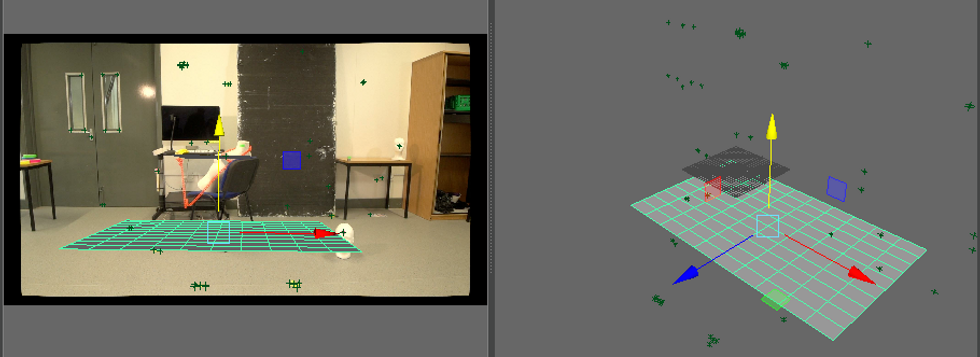
The master scene is meant to show how adding any object from Maya and later Compositing in Nuke for a better and realistic result.
NUKE Pipeline

GIf video (low quality)
Week11 (22/11/2018)
Assessment 2
-Process
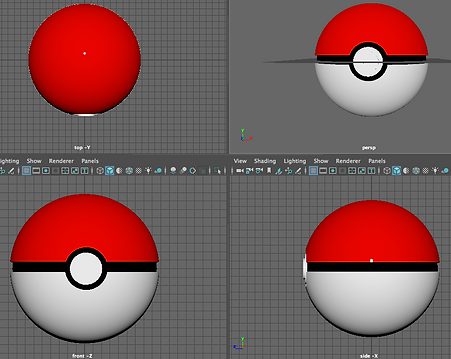
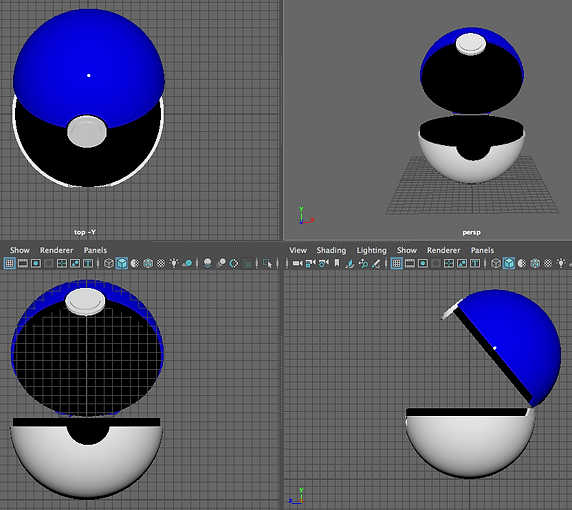
Pokemon Ball in Maya


Screenshots of the pokeball in Wireframe and Smooth Shape
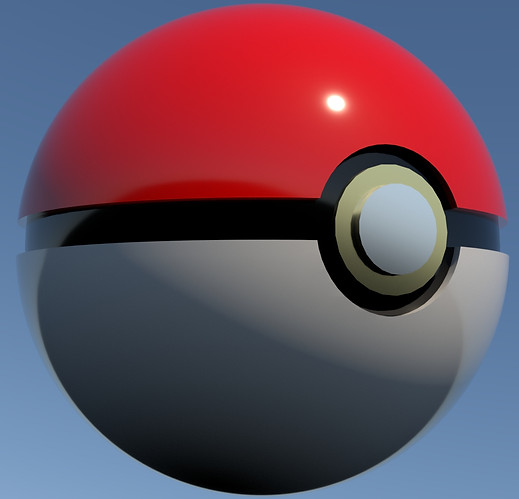
Screenshots and JPG render of the pokeball
Screenshots of the pokeball in Wireframe and Smooth Shape

Screenshots and JPG of the rendered Pokeball


PlayBlast of Pokemon Ball from Maya
This playblast has 1300 frames which make 13 seconds of video
Maya Settings for Pokeballs
Pokeballs in NUke (Pipeline)

Nuke Pipeline of Pokeballs
Video recording of 3DE processes (Pokeballs)
Pokeballs in After Effects (FInal Compositing)

Final
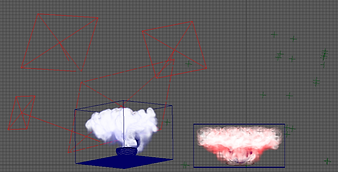
Final video with 2 CGI Pokeballs with smoke simulation
Final screenshot from the original video of 12 seconds

Due to Vimeo platform upload limitations, I am not allowed to add more videos for this week. Therefore, I added screenshots of the Pokeballs Breakdown.

