Nuke

NUKE
Friday, 22/09/2017 (Week1)


Nuke is well known as a node-based digital compositing application and also is used for television and film post-production.
In this first week, I learned the main shortcuts in Nuke such as; Command +A to select all, T to bring the transform node, S for settings (always pressing in properties) also pressing the space bar on the keyboard, viewer or node graph will be bigger.
Roto
Friday, 29/09/2017 (Week2)


Before doing anything like Roto in Nuke is good to play the video footage first (by pressing the button PLAY or selecting the frames in the timeline) so we can get a better idea of the shots and the shapes we are actually rotoing.
Then we create a matte in a manual way for means such as, insulating an areas of the footage in order to grade, blur or even cut out the area selected.
Rotoing hand

When rotoing organic shapes, is best not to use just one shape, the best is to break the object down in parts such as; lower arm, upper arm, shape for her hands and also shape for her fingers.
On the screenshot video above we can watch the final process of rotoing the arm.
Saving project in NUKE
In VFX, industry large teams work together in the same project, so is very important to keep an order for every video file and not overwrite each other work because many artist use the same sources. Therefore, I did this screenshot video in which shows how to name and save a project correctly in NUKE.
Luma Keying
Friday, 06/10/2017 (Week3)

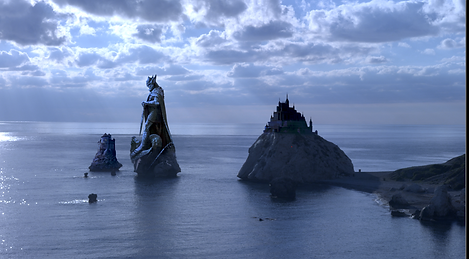
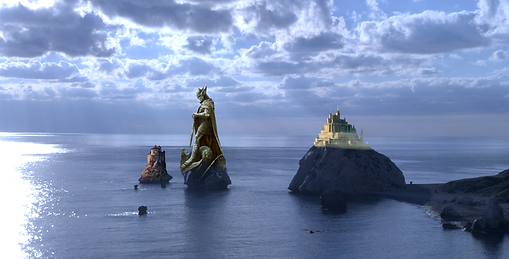
Luma keying is a keying based on the bright and dark values in an image.


Using luma keying I cut the sky out and replaced for a new cloudy sky.
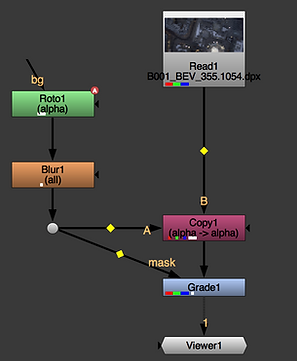
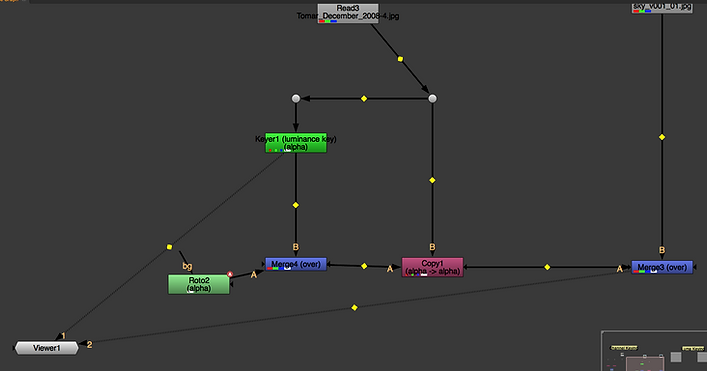
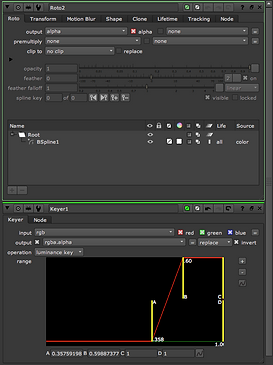
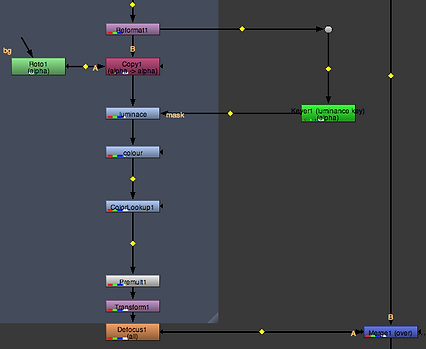
1- I started with a key node and connected to a copy node under the original image.
2- I clicked twice in the keyer node to marge the properties on the right side, then I ticked the invert box and started to move the yellow sliders in order to dark the sky and white the landscape. Basically moving around the black and white values in the image.
3- To see how the composting is looking, I added a Premult node under the copy node and a Merge node under the cloudy sky and connected together.
4- To fix the details in the image, I added a Merge node under the Keyer node and in that Marge node I added a Roto node to fill the land.
Green Screen Keying


1- I added a Copy node under the lady video and a Keylight node under the same video but on the left side connected to Copy node.
2- In the properties of the Keylight node I clicked the black box(colour picker node) and then select the green colour on the lady video by pressing Alt+CMD+Apple key.
3- I added a Premult node under the lady video and a Merge node under the background footage and connected them togather
4- I crerated a new Keylight node next to the previous one in order to improve the edges around the lady.
5- In the new Keylight node I moved the clip white and the clip black moving left to right.
6- To connect the new Keylight node to the rest of the nodes I had to bring a new Merge node under the first Keylight node and connect the the letter A to the second Keylight node but very important to change the Merge node over to mask.

As we can see in this other work, I used the same technique as the previous Green Screen Keying, with the different that I used some Roto in the Keymix to fix little details such as; the arm or the magic stick.


Grading Through a Matte
Friday, 20/10/2017 (Week5)
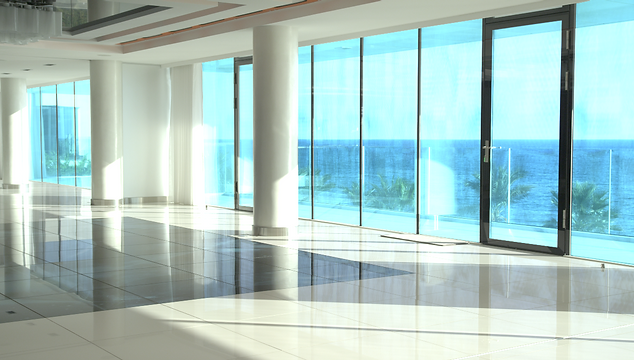


To change the colour of the windows, I used;
1- Bring Roto node and select the areas we want to grade
2- We do not use Copy node because Copy node is primarily for cutting and object out through a matte.
3- In Roto node, we select all the windows we want to change the colour.
4- Under the footage we bring a Grade node and me connect to Roto node
5- With Grade node selected, we change the colour the way we want.
Grading different elements in the footage;
1- Add Grade node under the statue and we move Gamma and Multiply (trying to get the same luminance as the rest of the image)
2- Add another Grade node to change the colour, select Multiply and move the colour wheel until we match the colour with the image.
3- Bring a Keyer node and connect to something before the Grade nodes and after start moving the yellow sliders, also a Blur node will help to look better.
4- Add another Grade node and connect to the Blur node to polish the image.

Tracking
Friday, 20/10/2017 (Week6)

RotoPaint and Moving Pach
Friday, 10/11/2017 (Week9)
Transform Node: We add a Transform node under the footage and then we are allowed to rotate, scale or translate the image.
Point Track: The way to create two point tracking we add; A Tracker node that connects with the image and select the first track point in one object and the second track point in the another object, then we select the two track points at the same time to track forward. After this, in the tracker properties we select the transform window to change NONE to MATCH-MOVE1 and we apply the Tracker node bellow the Roto node which is connected with the Copy node under the footage. We can notice that the tracking is not perfect, to fix this we just have to click the boxes T, R and S.
Planar Tracking: We add a Roto node and select the area we want to track, when the Roto is done, we select and click (planar-track-this shape fwd). To export the tracker information we just done into another node, we select the box above the footage and export it in CornerPin node. Then we add another Roto node and select once again the are we want to track. Later on, we place a Grade node under the footage and connect it with the new Roto node, in the middle of these two nodes (Roto and Grade) we add the CornerPin node.

Static patch in movement:
1- Add Roto node and create a shape around the object and not over the object.
2- When Roto is done, we track it forward and export the CornerPind nose Relative Baked.
3- Add an FrameHold node under the footage and place a RotoPaint node above the FrameHold node.
4- Start Roto Paiting in the are we want to paint.
5- Add a Copy node under the FrameHold node and connect a Roto node
6- With Roto node selected we roto the are we paint before
7- Add the Premult node under the Copy node to get the patch
8- As the patch is not moving we place our CornerPin node under the Premult and the patch shall move.
Camera Projection
Friday, 17/11/2017 (Week10)
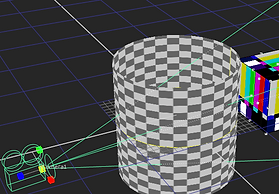


With this tunnel I created a 3D scene in which the camera moved through the tunnel. I used a cylinder with two cameras; uno static and the other one moving forward the tunnel.
Final Project
