Human Anatomy
Friday, 22/09/2017 (Week1)


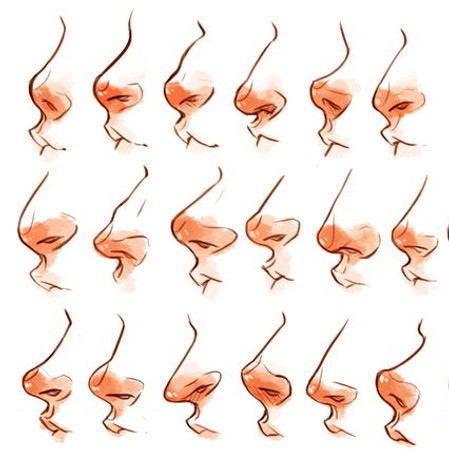
There are fundamental rules which are important to know and remember when drawing faces, these are: Nose always straight, eyes goes in the middle, eyes socket normally curved (it connects with the ear), teeth normally curved and face is quite small if we compare with the rest of the head.
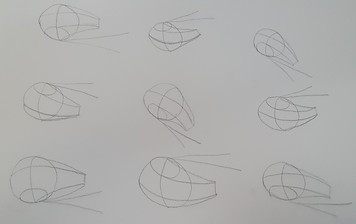
Techniques to draw a head for any angle are: circle, chop on the side and then drawing lines. This technique of drawing can be applied to the features of the face, but when starting the drawing you could look even further. I used the method of Andrew Loomis, whom was an American illustrator, author, and art instructor.


William Andrew Loomis was born in 1892 in Syracuse New York. He was a master at seamlessly combining products and fine art into one cohesive image and also a successful illustrator, advertising designer, and author in the first half of the Twentieth Century,
Andrew possessed an acute ability to bring focus to the product while maintaining the appearance of fine art. In 1922 Loomis opened his own studio, working in editorial and advertising for most of the top clients of the time including Kellogg’s, Coca Cola, Lucky Strike, Palmolive Soap, Ladies Home Journal, The Post, Redbook and Life magazine.
Two years after his death in 1959, his wife finished and published the last two books
Drawing The Head And Hands (1956) and Eye Of The Painter (1961).


List of muscles and landmarks
Friday, 29/09/2017 (Week2)
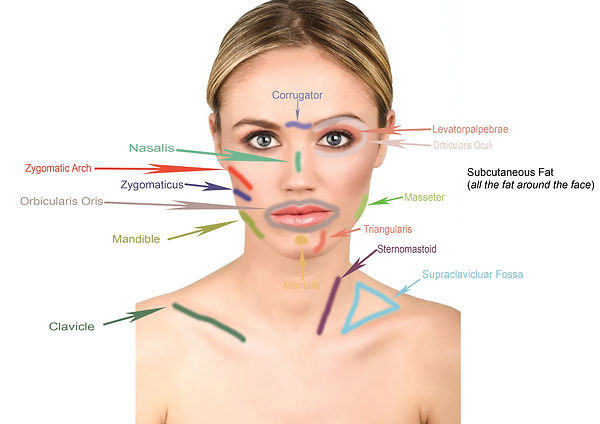


The purpose of this information is to name the Bones ( Zygomatic Arch, Mandible and Clavicle) and the Landmarks that covers the body protrusions that can be used to establish proper relationships between different parts of the body on the image. It's very important to know what is the name of the each part of the face and where it is located because when a human or monster is being created in Maya, every detail count in order to achieve a successful result.
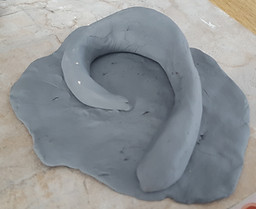
Clay Sculpts (Nose)


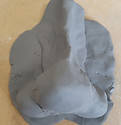
1
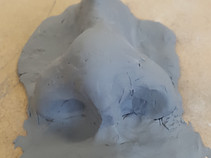

The Modelling Clay material was used to create a 3D human nose, on these pictures we can observe the process from the beginning to the end. As it was the first time creating nose, I had to follow some techniques in order to create a realistic nose.
-Shading the bridge: First step is to begin with the nose canal
-Shading the tip: Second step which is to place three sphere, two sphere together on the same level and the other one on the top of them. It's also important to mention that the sphere size will affect the shape, making it thin, thick, etc.
-Shading the nostrils: Third step is to create the nostrils with any circle tool such as the top of the pencil or inclusive with the little finger of our hand.
The process of these nose were interesting and very educative because to obtain a good result it's important to keep an eye in every detail, for example; the little curve that connects the nose and the Philtrum (columellar lobular angle) or the shadow that there are around the Alar Rim and Alar Crease.
Clay Sculpts (Ear, Eye & Lips)
Friday, 06/10/2017 (Week3)

2


3


Once I finished the nose, I began creating these 3 pieces of art (ear, eye and mouth) in 3-Dimension using Clay material, which is highly versatile and extremely easy to work with. In the text below, there is a brief explanation how I achieved the sculpture of those part of the face (pictures above).
Ear: The human ear is divided into three parts, the outer ear, middle ear and inner ear. Therefore, I created;
Hook Shape for the inner ear, T Shape for the middle ear and finally Bump Shape for the outer ear.
I attached those pieces together, manipulated them correctly and that is the final result.
Eye: Eyelids plays an important role while sculpting an eye because we can create; almond, hooded, slanted, droopy or round eye.
Lips: Creating lips do require some basic considerations; lips are not flat and have
different forms. With this information on mind, I began creating the upper lip which was composed of three masses two on either side and one in the middle making a cylinder.
Later, I started with the Lower Lip, which was another cylinder made with two pieces of clay.
Finally, I attached the lower lip beneath the upper lip leaving a little space between the two lips. This made it to appear as though the mouth is slightly open.

4
Zbrush
Friday, 13/10/2017 (Week4)


ZBrush is a great programme that allows us to make all kinds of sculptures and models with a high degree of creative freedom. In this programme we can find useful tools such as:
-Clay (BCL): This brush is intended specifically for sculpting with alphas, and will not cause other side effects.
-ClayBuildingup (BCD): This brush builds up the mass a lot quicker on the object.
-Dam_Standard (BDS): Useful for lines and fine details, but is sharper than the standard.
-Move (BMV): It's used to modify facial features into better positions.
-Smooth (Shift+Click): Useful for smoothing out small imperfections on surfaces, or for flattening large forms.
-Standard (BST): The Standard brush is the original basic sculpting brush. It can be used with all of the various brush modifiers, such as Strokes, Alphas, an edit curve, and so on. Also useful for sharpening edges
-hPolish (BH): This brush is very handy for sanding down rough spots.
DynaMesh is a new ZBrush approach to building volumes, which brings the program even closer to seamless digital sculpting and is also a perfect solution for free-form sculpting because it removes all need for focusing on topological constraints. In other words no matter how much volume you add, we still have the same capacity for sculpting.

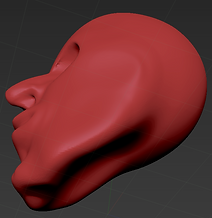
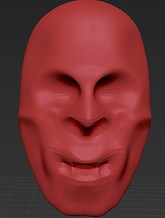
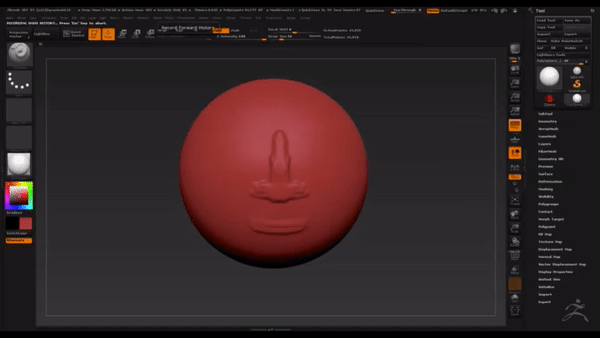
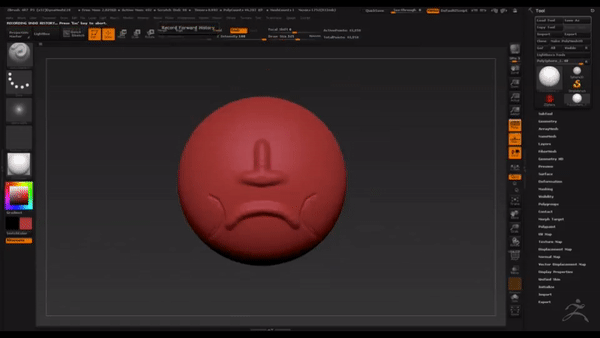
These are my first faces made in ZBrush. It's important to mention that it was my first try using this impressive programme.
We can observe on the left hand side, the eye sockets are too deep and on the other photo, eye sockets are fine but the face has not been polished properly.
<< >>

Mouth and Nose
Friday, 20/10/2017 (Week5)
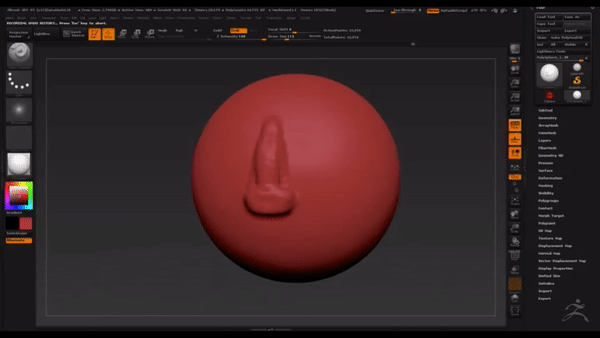


Eye
Friday, 27/10/2017 (Week6)
This video shows how to add an eye while creating a face.
1st: Select subtool and click insert Sphere 3D
2nd: We click the option "activate edit opacity"
3rd: Select Move to move the sphere
4th: Select deformation and move the option size to make big or small the sphere.
To obtain a good result is important to follow these steps. This method is not just for creating an eye, it could be useful for creating different things such as; neck, body, etc.
Monster
Friday, 27/10/2017 (Week6)
With this simple monster I want to show how powerful Zbrush is.
We can see the tongue split in two, four horns, couple of teeth, the hole of the nose, two eyes socket and the illusion of a skull I tried to create.

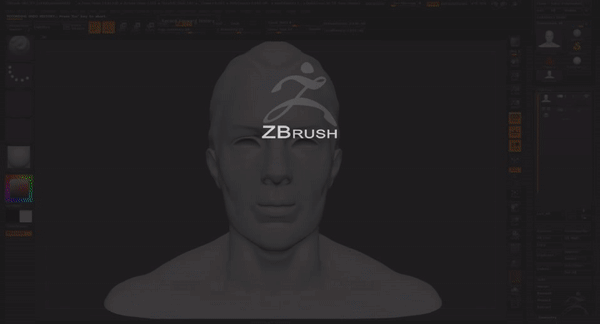
Head Texture 3D
Friday, 10/11/2017 (Week8)
Adding the texture in Zbrush is very important, as it gives to our object "life".
This screen recording goes through of each step that has to be followed.
1st: Click texture
2nd: Import an image into Zbrush
3rd: Change the colour of our object to white
4th: In the wheel tool that will appears we can resize, change opacity and use the spot-light of the image and apply to our object.
Is very important to select RGB and unselect Zadd before start adding texture


This is the final result following the steps mentioned above and using a texture of head in 3D.
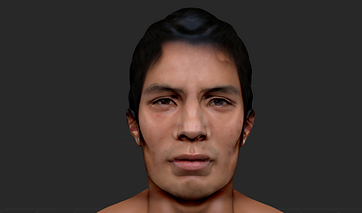
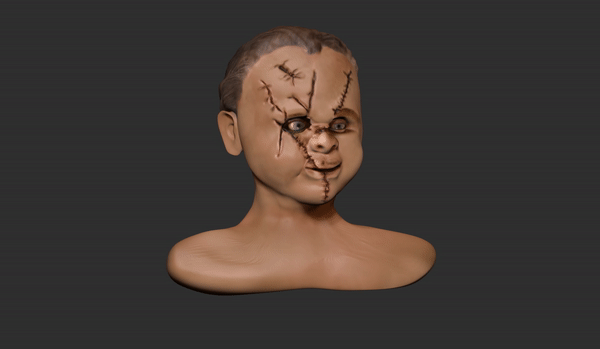
Villain


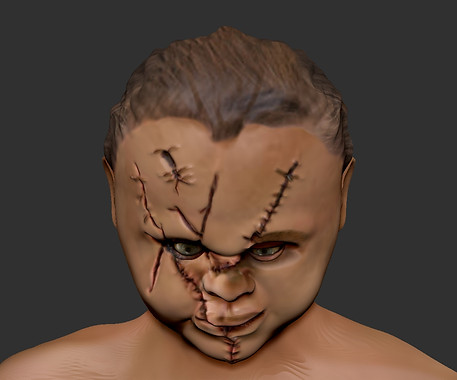
Creating this villain was very helpful for me because I learnt how to add more than one texture for the same object, make the eye lids and of course create a villain the most real possible following the face structure. There are some parts that I have to improve such as the neck and the proportion of the face on both sides.
Overall, I am really happy with this work because my aim was to create Chucky and Scarface in a Villain and this is the final result.

Full figure dynamic pose
Muscles
Friday, 1/12/2017 (Week11)


Knowledge about muscles is essential because if we miss some part of the muscle whilst modeling in Zbrush, our figure will not look right and the audience will notice it that the figure is not done taking into account the muscles details.
Manipulating the Sphere
Friday, 1/12/2017 (Week11)
Full figure dynamic pose
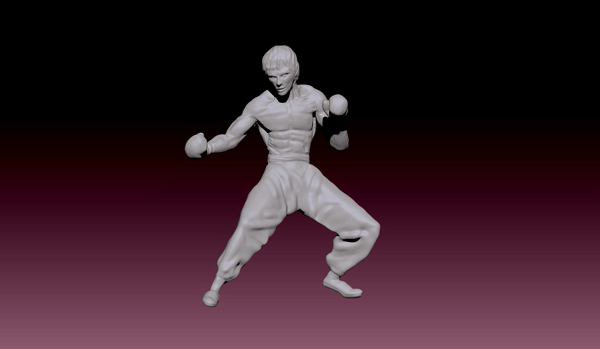
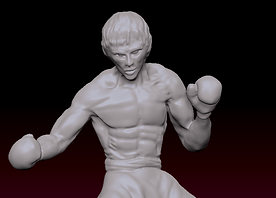
Bruce Lee with Boxing Gloves
In this video we can watch how to create a body structure from a Sphere. Move and Draw tool are essential in this body structure, also DynaMesh in a resolution of 344 is necessary to get a good polish looking.

Poses
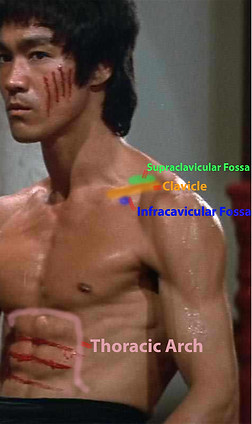
With the mannequin already in the pose required, I begun modeling Bruce Lee guiding me with some photo references that I found in internet.
The main tools I used were; Move tool, Clay, hPolsih, Dam Standard and Standard.
I spent approximately 3 days to get this 3D modeling done.


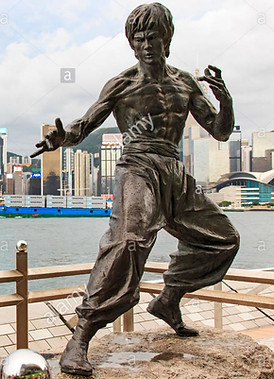


These 4 photo references of Bruce Lee monument in Hong Kong helped me a lot while modeling Bruce Lee in Zbrush. Following the monument poses taken in different angles, I tried to copy every single muscle, face expression and even his hair style.
Later on I came out with the idea of putting boxing gloves on Bruce hands giving a better looking and making an unique Bruce Lee.


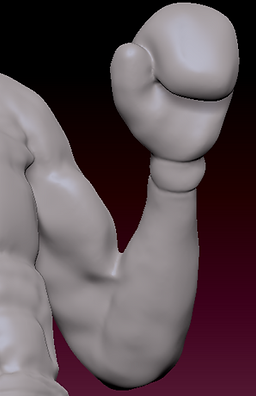
Modeling boxing gloves in 3D was a good experience because, it seems easy to model but to give that realism is important to focus in some details such as; the thumb, wrist and the palm of the hand.
This is the video history of my Bruce Lee modeling in Zbrush.
Here we can watch every step I did, the techniques I used for the hair or for the clothes and also the tools that help me to build the muscles.
Bruce Lee